Thursday, June 11, 2009

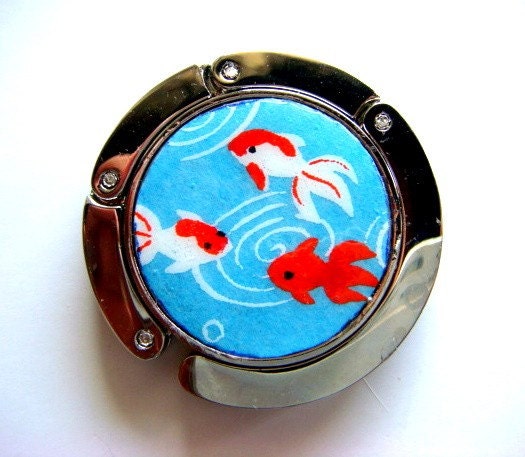
New Work: Foldable, Portable Purse Hooks

by Jennifer Tang of MaJenta Designs

TIRED of going to a restaurant or bar and having your purse taking up half your seat? or risk being knocked off the back of your chair? or worse yet - sitting on the dirty floor?! Then you'll really love my new product line of Foldable, Portable Purse Hooks!

I was so excited to put these to use when I went for a night out on the town, and I can attest that they really do wonders! After a long day at work, my friends wanted to hit up a bar, but the only table left was a tall standing table. Well, its never fun to be standing around, with your stuffy coat on, and heavy purse wedged into your arm pit and weighing down your shoulder.

Then I realized that I had a handy dandy "Foldable, Portable Purse hook" inside my purse, and viola! I was able to hang my very heavy purse (with a heavy academic textbook inside) AS WELL AS my coat too!


I'm so excited to have these products available at MaJenta Designs Etsy shop as well as soon to be available at my upcoming shows!These convenient little hangers will make their debut at the:

Boston Handmade show at the SOWA Outdoor Market
Sunday, June14, 2009. (10am – 4pm)
540 Harrison Avenue, Boston, MA 02118

Custom Wedding Cake Toppers

By Crystal of Vintage by Crystal

I love making custom wedding cake toppers that cater directly to a couple's tastes and wishes. I do a lot of custom orders and it's wonderful because it prompts me to create something I never would have thought of on my own. Like the gorilla and bear musicians in the photo above. Who would have thought? And this piece really reflects the personalities of the couple it was made for.

And who would want a rat on their wedding cake? This is certainly something I couldn't have dreamed up on my own...but look how cute they are in their wedding garb! Who knew rats could look so proper and charming?

Yay for custom wedding cake toppers! Click here to download a custom wedding cake topper order form to order one of your very own. :)

Wednesday, June 10, 2009

DSN 2009, Part II - Creation and Innovation

by Liz Stewart of Lush Beads

(Part I in this series is here.)

Now that I have gathered some pieces together, it is time to pick out my materials and get to work designing something!

I decided to use the chain and the rusty ring in my piece. I sprayed Krylon on both to seal them and keep them from degrading. I then went through my stash of beads, findings, and fibers, and pulled out some materials that might work well together.
I found some chunks of dyed blue coral, some blue and rust fiber strands, some dark blue 20 gauge wire, and some matte metallic blue iris seed beads. My initial thoughts were to create a multi-strand piece incorporating the chain, the fiber strands, and the pieces of coral wire-wrapped together.

As I started to wire-wrap the coral together, I realized that this would result in a very short necklace! The chain piece was also pretty short. I added a wire wrap to the end of the chain, with the intent of joining the coral there and continuing the wrap up to the clasp. I put that idea aside and instead wove the fibers in and out of the chain to give the chain a softer look. I cut the fibers long so that they would make up the bulk of the back side of the necklace. The wire-wrapped coral strand can be made the same length as the chain, so I will join them together with a few wire wraps and attach both to the fiber strands.

As you can see in the photo below, I had a 5th piece of coral that I was going to use but it split in half when I put the wire through it. I did glue it back together, and decided not to use it in this project. I will use it in something else.
I planned to use the rusty ring as a pendant, so I got to work beading a bezel around it with the seed beads. I considered embellishing the bezel to make it more fancy, then decided against it. I wanted the ring itself to be the showcase, not the beading around it.
I will add more wire-wrapping to join the 2 coral segments together, put the pendant in the middle, and finish the fiber ends with bead cones and a clasp.

Next week, I'll show off the finished piece and the rest of the Dirty Smelly Noisy exhibit! The exhibit runs through the month of June in the loading dock at the Western Avenue Studios in Lowell. It is an open exhibit, so come by any time between 10 and 5 to browse!

Tuesday, June 9, 2009

Fuller Craft Museum and Danforth Museum Shop

by Kirsten of Kirsten Bassion Ceramics

Kirsten Bassion's work is now sold at the wonderful Fuller Craft Museum's Shop in Brockton, MA. Kirsten was invited into the Fuller's Museum Shop after the director/curator bought a piece of hers at the CRAFTBOSTON Show in March.

And the Danforth Museum's Shop in Framingham, MA where they had apparently been following her work for some time.

Sunday, June 7, 2009

Guilty Pleasures

by Brooke Pickering of Bancroft Studios

One of the best parts of being back on the retail show circuit is discovering all the beautiful crafts produced by my fellow artisans. If I have a successful show I always treat myself to something wonderful made by a fellow vendor.

Recently I participated in the North River Art Societies Festival of Arts in Marshfield Ma. Although the weather was a bit sketchy the locals came out in droves to support us and a good show was had by all.

At the close of the show I purchases these magical bowls by Tess from Flying Pig Pottery in Woods Hole Ma. They now live on my kitchen counter where I can admire them everyday. I am hoping for a successful summer show season so I can pay some bills and add to my growing collection of goodies!

Saturday, June 6, 2009

Shaker Moneymaker

by Alicia of Chroma Lab

At Chroma Lab, our main focus is to restore and paint vintage furniture by hand, making it vibrant and modern with colorful patterns. But we have a few other tricks up our sleeve, too. Well, Tony does, at least!

Tony is an adept woodworker, and recently he has been "sharpening" his hand tool skills while building some of his own furniture. He made this Shaker-style table using various hand tools--dove tail saws, chisels, and three different kinds of planes, among others. Most of the hand tools he uses belonged to his great grandfather, who was a master woodworker and builder by trade. It's all in the family; Tony's dad loves woodworking, too.
Tony started with a full scale drawing, then cut the legs and sides.

Next he built the joinery for the table, which includes the mortis and tenon (to join the legs), and the dove tail joints that hold the drawer together. I can say this, because he won't brag for himself, but aren't those some fine hand carved dove tail joints?
After the drawer and the legs were all together, he built and attached the table top. Tony then smoothed each surface with a hand plane, and popped in the knob, which he made turning on a lathe.

Friday, June 5, 2009

Boston Handmade at SoWa Open Market!

by Jen Paulousky of Blue Alvarez Designs

Boston Handmade is at it again! For the second year in a row we have been honored with top billing at the SoWa Open Market!


Come join us Sunday, June 14th from 10 am 'till 4 pm at 540 Harrison Ave., Boston, MA for a day of handmade goodness! We'll be flanked by a fresh produce market, a new antiques market, loads of other artisans, and live music by The Grownup Noise!

Hope to see you there!
Related Posts Plugin for WordPress, Blogger...