Sunday, August 16, 2009

Lion and Lamb

by Lynne of cozycottagecreations

Recently a customer contacted me to make a needle felted "Lion and Lamb scene". I was thrilled that she had looked through my previous work and chosen me to create this piece for her. And, this was one of those requests where I could just smack myself on the forehead with "why didn't I think of that!". The symbolism and the image of the lamb lying down with the lion speaks to me deeply, and I was excited to have the opportunity to create my own version.

I thought I'd share with you a little bit of my process in making this.

Needle felting is a very laborous - and very addicting - art form. It involves taking unspun wool, called roving, and poking it with a very sharp barbed needle many many times. It always amazes me that this simple action can transform a non-descript ball of wool into a sculpted piece. The magic is in the barbs on the needle. As the needle is pushed in, the barbs cause the tiny tiny fibers that make up the larger (but still tiny) fiber to grab on to each other, which then starts to create a form. By poking and poking the needle at strategic angles with the right size needle and the right color wool, virtually anything can be brought to life. A finished piece usually feels very firm and solid, while the wool it was created from was once loose and squishy.

Whenever I work on one of my needle felted scenes, I never do it in one sitting. I like to work on these projects in segments lasting anywhere from 30 minutes to two hours. Two hours is really the longest stretch of time I can work on the needle felting. It's a very impressionistic art form, with the blending of the different colors of the wool fibers. After two hours of focusing on these tiny little fibers, my eyes start to get really wonky. Plus my brain likes to work away at these things while I sleep.

This particular piece took about six (maybe eight) sittings to complete. One of the true gifts to me in this project was that my customer did not have a quick deadline. She contacted me in June, wanting this piece in October. During the summer when my kids are out of school, I really can only work at night, and at that point I am dog tired. So it was a pure joy to be able to work on this when I was up for it and not just wanting to throw myself in to bed.

The first thing I did was create the form for the lion's body out of some core wool. In following a photo the customer had provided, I fashioned the paws and hind legs. Once I had the basic shape, I covered it in a butterscotch colored roving.


Here you can see the photo I used as a guide. (for some reason I liked the look of the lion's head on the other side) In taking a fresh look, I realized I had made the front paws opposite from what they should be. I subscribe to the notion that you only get one chance to get it right, so I took the plunge and cut off both the lion's front paws with my really sharp scissors and switched them. The surgery was a success and you would never know. That's a wonderful thing about this medium. If there's a part that's not going well, you can just cut it off and adjust.

I'll admit that at this next point I fashioned the lamb's body, but forgot to get a photo. It basically looked like an oval wool ball with a head. I decided I wanted the lamb to have curly locks, so I ordered some from Etsy seller DraigAthar and waited for it to arrive before moving on with the lamb.

The lion's head was probably the longest I sat for. I intended to put on just the mane, but once that was there I just kept going and made his face. I looked at a lot of photos of lions on the internet and was pleased with how it came out.


The final steps were in putting in the details. I added the lion's ears, gave him a tail and put padding on his paws.

In a separate sitting, I finished up the lamb with some front legs, ears and eyes made from seed beads firmly sewn on. It was that last step - the creating of the lamb's eyes - that brought it all to life.

Take a look at the first photo of this blog post for the most detailed look at the finished piece. I'm thrilled I got the opportunity to create this, and it's off to it's new home!

Saturday, August 15, 2009

Outside the Box

By Betsy of Stonehouse Studio


I'm artistically curious. I love to get a glimpse of the process behind the finished product, and one of the best ways to do that is to take a workshop. One of the first things I did when I left my corporate job a few years ago was to take a mixed media class at the Museum of Fine Arts here in Boston. I had already discovered polymer at that point and had no intention of pursuing wood block printing, pen and ink drawing or mono printing, but I wanted to get my head around how it was done. Workshops also give me a healthy respect for fellow artists and crafstpeople - only when you try your own hand at something do you realize just how much talent, practice and vision is involved in the creative process.

I also take workshops in my medium of choice - polymer clay. I love watching the masters at work and I get something out of each and every class I take. Sometimes the class is an epiphany - Maggie Maggio's color class completely changed the way I approach my work. Usually, though, it's not so much the technique, but one or two details that influence and inspire me. From Kathleen Dustin I learned that there is rarely a mistake that can't be fixed. Louise Fischer Cozzi taught me to just relax and be joyful in my work, and Seth Savarick taught me the importance of flawless craftsmanship. I also love meeting fellow polymer aficionados at these classes. I met Melanie West at my first workshop and we have gone on to take several workshops together - she has helped me enormously in making the transition from hobbyist to artist.

The picture is of a Japanese style inro box that I learned how to make in Seth Savarick's class. Vessels are lots of fun and a pleasant break from jewelry. So think outside the box and have fun - take a class!

Friday, August 14, 2009

Some New Work

by Nancy of nancyrosetta

I love to crochet. I have been crocheting with sterling silver for years. Usually single strand necklaces with gemstones or pearls, sometimes 3 or more strands, but strands nonetheless. In an attempt to use up some the ends of the spools of light gauge silver wire, I started making little abstract shapes. Here is what I did with them.

Amethyst and Pink Chalcedony

Carnelian and Ruby Tourmaline Garnet

And my personal fave...Labradorite

These debuted at SoWa Sunday August 9th, and they turned out to be a big hit!

Thursday, August 13, 2009

Medal Day at MacDowell Colony

by Katy Brown of muchacha K handmade

I received a mysterious invitation from a friend the other day. "Are you headed to MacDowell tomorrow or do you want to join our caravan for a picnic lunch?"...a random invitation to a famous artist colony that normally does not allow visitors? Hell yeah!

But why were they open to the public this past weekend? It was Medal Day and the recipient of this year's award was Kiki Smith. My instructions were to "pack a lunch and wear walking shoes" and so I did...
MacDowell Colony, located in Peterborough, NH, is the oldest artist colony in the United States, founded in 1907 by the wife of composer Edward MacDowell, at her ill husband's request. Peterborough is a beautiful town located in lush, green countryside; it's easy to see why they chose it as the home for their colony. Artists apply for residencies that last several weeks and spend their time at MacDowell in a small private cabin in the woods where no other human is allowed without their permission--lunch is delivered to the door. Bicycles are the preferred mode of transportation.
The Medal Ceremony was surprisingly entertaining and both MacDowell representatives and recipient Kiki Smith herself spoke. One of the recurring themes in the speeches given was the importance of the bravery of artists, and of supporting the development of art and culture even in the face of violence or political turmoil. I was moved.
After the ceremony we ate our picnic lunches in a big green field and then headed off into the woods to make the most of the one day per year where the studios are open to the public. We were welcomed into the worlds of composers, painters, photographers, far more conceptual artists, novelists, poets, playwrights and more, and all were gracious and very giving of their time and work. What a luxury, both for them to enjoy the usual solitude, and for the rest of us to be able to share it for just an afternoon.
I rode home in the car overwhelmed by all of the ideas they shared, and inspired to return to my own work.
(Sketches by visual artist Nick Lama...)

Wednesday, August 12, 2009

Day at the Beach

By Kerry of Khawkinsphotography


I just love a beach and California beaches especially. We visited Malibu beach on Sunday, these are some shots from our trip. My niece is truly a beach girl, writing in the sand, making sand sculptures, and of course swimming. My friend and I took a walk down the pier to grab a snack and check out the scenery. We came upon this little chihuahua along with tourists, fishermen, and even a pelican.

Tuesday, August 11, 2009

Gloucester

by Lucie of Lucie Wicker Photography

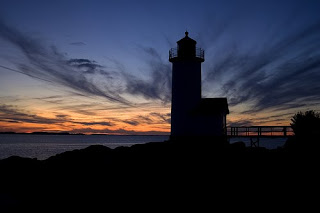
Ever been to Gloucester? Summer is the time to go! Restaurants, beaches, lighthouses, boats, real live fisherman... everything you could ask for in a quinessential New England town.

Related Posts Plugin for WordPress, Blogger...