Tuesday, September 30, 2014

Interview with Boston Handmade Member Melissa Glick


by Melissa Glick of Hacker Junk Creations

atmitflea500

BH: Tell us a bit about yourself (name, location, affiliations, personal stuff).

MG: Hi, I’m Melissa Glick, I live in Central Sq Cambridge with my ltbf Sean and work out of the Artisan’s Asylum (huge maker space) in Union Sq Somerville. I have been involved with the Nave and Nave Annex, www.navegallery.org two all volunteer run galleries in Somerville for over 10 years.

BH: What is your background? (family background, education, former/current day jobs)

I am a youngest child. Grew up in Lexington and studied Art History at SUNY Purchase and at The American College & Parsons in Paris. I have a masters in Art Education from Mass College of Art. I didn’t have the temperament to be a school teacher so instead I managed educational programs at cultural institutions including: Cambridge Multicultural Arts Center, Arts in Progress, The Boston Public Schools, Mass Alliance for Arts Education, Boston Ballet, ICA and The Museum of Fine Arts. My grandfather went to Cooper Union and my sister inherited the sewing talent and makes costumes.

BHmosaic500

BH: How long have you been doing your artwork/craft?

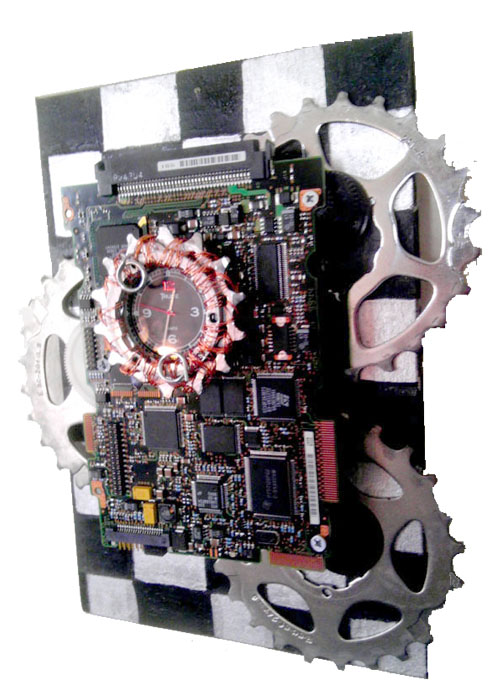
I’ve been doing Hacker Junk Creation for almost 3 years. Previously I did photography. I learned to work in the dark room in high school. I was an early adopter of the digital medium and spent many hours experimenting with Photoshop. I may not know how a computer does it’s magic, but I sure know how to take them apart!

BH: Describe your work.

I transform old computer parts and recycled paper into assemblages, mosaics, tiles and clocks. I play with pattern, perspective and illusion by combining a plethora of 3D abstract shapes, colors and materials found in e-waste with 2D imagery from my personal collection of cultural relics.

river500

BH: Please describe your creative process (how, when, materials, etc).

When I took apart my first computer I was amazed to find so many unusual abstract shapes made of many kinds of materials in many beautiful colors. I was immediately reminded of some of my favorite artists, Bauhaus, Louis Nevelson, Mondrain. Along the way I have learned techniques for attaching and manipulating the materials involving lots of tools, woodworking and recently 3D design software and the CNC Router. My work is about visual connections, playing with shapes, patterns and composition.

BH: What are your favorite materials?

What’s not to love about a shiny hard drive platter that makes a beautiful tone when you tap it? Stators look like snowflakes and come in original copper, blue, green and even red. I especially love the tiny little bushings and other connectors with geometric cut outs.

3rdclock500 
BH: What inspires you? Where do your ideas come from?

I studied Art History and have amassed a collection of images of art and other graphics that attract my eye. Its an alchemy of bringing together obsolete mechanical parts with the line and color of beautiful images. The first time I saw the plastic sheet under a key board I immediately thought of Mondrian’s Broadway Boogie-Woogie. By incorporating reproductions of works of art I am giving them new life and reinterpreting them in my unique manner.

BH: How do you promote your work?

Open studios at the Asylum brings over 300 people in. We also host other events where people can see my work displayed by my space. Being involved with the Nave Gallery provides exhibition opportunities and keeps me in touch with the community where I learn about new projects to get involved in. The Somerville Arts Council www.somervilleartscouncil.org supports the artist community by producing many wonderful events and projects to get involved with. I have a website at: Melissasglick.com.

chocolatecake500


BH: What’s your most interesting fair/show experience?

The Trash Bash! This was the 2nd year # Graces Productions put on the event. Artists who work with recycled materials get to display and the audience votes for their favorite piece in many categories. There are bands and information about recycling. These are my people!

BH: Why should people buy handmade?

Something handmade has a unique quality and is endowed with the spirit of it’s maker. Being creative and making the world around us more beautiful is a very valuable skill.

BH: How long have you been involved with Etsy and what have your experiences been?

I opened my store in 2008 but never really used it until 2012. I have sold 2/3’s of my work to people in San Francisco, which is totally awesome. I have watched some videos about marketing and love the whole international craft marketplace economy phenomenon, but I wouldn’t consider my experience to be a success. My Etsy shop is called Melsplace, come visit!

nhnecklaces500


BH: Name your top five books, movies, songs/musical groups, and web sites

MG: Websites: http://beautifuldecay.com, www.lostateminor.com, whatshouldireadnext.com, www.thisiscolossal.com, www.sca-roadside.org, www.instructables.com

Movies: Amelie, Roman Holiday, Big Fish, Almost Famous, Train Spotting, Usual Suspects, City of God, Black Swan, Borat, Moonrise Kingdom, School of Rock, Secret Life of Walter Mitty, Break Back Mountain, Blood Simple.

Songs: Regina Specktor: Eet, Dylan: Knocking on Heaven’s Door, Bruce Springsteen: Thunder Road, Decemberists: Cinnamon

Books:Night Circus, Erin Morgenstern, Traveling with Pomegranates SM Kidd & AK Taylor, People of the Book, Geraldine Brooks, Song of Chameleons, Truman Capote

BH: Is there anything about you that would surprise people to know?

I was an extra in the Martin Scorsese film The Departed. You can see me just over Martin Sheen's left shoulder as he exits the South Station T station.

Monday, September 29, 2014

Monday Mosaic: Morning Cup

curated by Susanne of enchantedhue


Felted Wool Coffee Press Cozy by straynotions
Coffee or Tea Cup Cozy by StephanieCaveDesign
Holiday Photo Mug by jbarrows
Unisex Sampler Scarf by Loomination

Mornings are getting colder and darker now. There is nothing better than a cup of hot aromatic coffee or tea to warm your hands and waken your mind and a nice warm scarf around your neck to make watching the sunrise more cozy.

Friday, September 26, 2014

Why Handmade: Visit to Prunella’s Workshop

by Lynn Mohney of Prunella’s Workshop

This week marked a historical event in Prunella’s Workshop’s history. We had our first tour, demonstration and lesson. Boston Handmade members joined us on this momentous occasion and managed to convince me it can be done. Not only is it possible, it was a lovely experience.

Our shop space is limited. Our room had to be divided in half to provide an adequate safe place for a toddler to play during the day. While many crafts are possible with a toddler directly under foot, we work with oxy-propane torches. Having a child grab your elbow at an inopportune moment is not a great plan. That said, our space is planned out efficiently to maximize the number of tools available to us.

Jill of Early Bird Designs forming a bracelet

After pleasant conversation over refreshments in the playroom, we adjourned to the studio, where I introduced Boston Handmade to my workspace. I handed each lady a copper bracelet blank, explaining that, while not fully annealed, the blanks were not work hardened. Annealing is the process of heating up the metal so it is soft and pliable. The metal becomes work hardened as we work it with hammers, and if it is worked too much it can become brittle and break. I invited my guests to bend the metal with their bare hands. A common misconception is that metal will not bend as it is cold and hard; as such timid hands will not bend the bracelet. I demonstrated the metal would bend quite easily, and could easily be hammered flat again.

I proceeded to demonstrate the use of the hydraulic press. While the bracelets could be made in their entirety without the press, I wanted to to show this quick and easy process. Yet another eureka moment occurred when they realized the nylon the bracelet was formed into was quite solid. When in action, the pressure of the press squeezes the nylon in such a way it appears almost as soft as jell-o! I did a quick annealing demonstration in which I showed how to add a hammer texture and the process of making the bracelet without the press.

The real fun was to follow! Jill of Early Bird Designs showed us what she had learned by making a bracelet of her own she was able to wear home.  There is nothing like watching someone learn something entirely new. Jill was a great sport, and she made it look really easy. That was when I made my deep dark confession. I too had never made a bracelet using the hydraulic press before, as typically this is my partner’s domain.


All in all, this was an interesting learning experience for me. While I am comfortable with my processes, I had never branched out into teaching prior. I wasn’t entirely certain how it would pan out, but I was confident my Boston Handmade team would be patient with me should my plan not work out as intended. I learned I needed more time! These experiences never play out exactly as I imagine in my head, but I am pleased to say it was fairly close.

Have you ever done a demonstration/lesson in your studio? How would you prepare?

Thursday, September 25, 2014

What's in Your Bag? Craft Show Edition!

by Leanne of Loomination

You've seen it in the fashion magazines: when they unpack everything in a celebrity's handbag and she's got a laundry list of expensive cosmetics, a bottle of Evian, and something really down to earth, like a dog eared paperback or one of her child's favorite toys. No one wants to know what's in my handbag - it's seriously nothing to write home about.

The real question on our minds is what's in your craft show bag? That's where the magic happens!

My Regal Craft Show Bag

I have a large black shoulder bag made by Regal that's full of compartments and pockets where I can store all kinds of stuff. I think this bag, which my mom found at a yard sale, was originally intended to store craftbooking supplies, but it's really perfect for a craft show bag.

The inside!

Here's the very long list of essentials that I keep inside:

Business cards & hang tags
Business cards of stores that carry my work
Postcards for upcoming shows
Mailing list sign up sheet on a mini clipboard

Three card readers (two Square and one PayPal, just in case)
A knuckle buster and carbon sheets (really, really in case)
Coin purse with change
Phone charging battery and wall charger
Pre-moistened lens cloths (great for cleaning your phone screen)

Three ring binder with my sales permits and paperwork

String
Safety pins
Straight pins
Scotch tape
Measuring tape
Lint roller
Scissors - three different size pairs
Pens
Chalk Pen
Stylus
Sharpie

Napkins
Anti-bacterial wipes
Sunscreen

Chalkboard tags
Credit card sign

Handy clear pockets

If you're building a craft show bag, these are some great essentials to consider putting inside. A lot of these items are really particular to my work as a fiber artist, such as the multiple pairs of scissors, the lint roller, and the different kinds of pins.

I carry a million credit card processing options, a phone charging battery, a stylus and special cloths to clean my phone because at my price points most sales (some days all) are made with credit cards.

It seems like I might be carrying too much, but every time I take something out, Murphy's Law kicks in, and that's the one thing I'm going to need at the next show. Last week I had an indoor show and didn't want to bring a ton of stuff, so I took out the most essential essentials to bring with me and left the bag at home. The one thing I really, really ended up needing - string - was something I left behind. Luckily I was able to pull a McGuyver with a strip of fabric, but if I'd had the string, it would have worked out much better.

Lots of storage!

With the busy holiday season it's a great time to get organized, especially if you're a first time exhibitor.

What do you keep in your craft show bag?

Wednesday, September 24, 2014

Handmade for Kids: How to make a puzzle using a cereal box

by Bev Feldman of Linkouture

 
Here is a really simple project that you can do with your children's drawings so that they can be enjoyed again and again in a new way. Just make sure to check with your children first that they don't mind cutting up their pictures!

All you will need for this project is:
  • A drawing (or even a photo your child took, enlarged to fit a sheet of paper)
  • Cereal box
  • Glue
  • Scissors

Cut open a cereal box and cover it with glue (I recommend using a glue stick or spray adhesive) and adhere the image to the picture side of the cereal box. Make sure the entire picture is securely glued onto the box; you don't want to miss any spots, otherwise it might not stick properly after you cut out the pieces. 


After the glue has dried, trim any excess cardboard.


Now comes the fun part! Flip it over and turn to the plain side of the box and draw in puzzle shapes. You can make the pieces as big or small as you would like (depending on your child's age), and draw whatever shapes. There is no right or wrong way to do it! Or, if you need help, you can download a puzzle template and glue it to the cardboard. 

Once you have all the shapes outlined, cut along the lines.


Your child's puzzle is down! Now it's time to put it all back together. 

Tuesday, September 23, 2014

An Artisan's Day

by Leanne of Loomination

For the past year, I have been working mostly full time as an artisan. Before that, I had a day job and squeezed my studio time into days off that were already jam packed with chores and errands.

I always thought it would be amazing to devote myself completely to my craft and wondered what my days would be like. I spend the vast majority of my time weaving, but there is also a lot of work that goes into the running of a business. I recently finished a business program that really changed the way I work and the structure of my days has changed a lot. We have a live/work studio, so on most days I don’t leave the house, which can sometimes feel a bit claustrophobic.

Studio side of the loft

Here’s a glimpse into my recent (super-glamorous) schedule, so you can see what it’s like for yourself!

Wednesday:

7:30 - rise and shine (yeah, I know, that’s super late, I’m working on it, I swear!)

7:30-9:00 - computer work. (Today it was working on my wholesale line sheet and figuring out a password protected area of my website for wholesale ordering.)

9:00-9:30 - yoga

9:15 - boyfriend leaves for work

9:30-10:30 - breakfast, shower, walk the dog (who has to sniff EVERYTHING)

Recent work in progress!
10:30-2:00 - weaving

2:00-2:15 - lunch break (leftovers - no cooking today!)

2:15-4:00 - more weaving

4:00-4:15 - another dog walk (again with the sniffing)
 
He's cute, though, so it's worth it!
4:15-7:00 - still more weaving

7:00 - boyfriend returns from work

7:00-8:30 - cooking, dinner, Netflixing (currently: Boss)

8:30-11:00 - more computer work while Netflixing (tonight it's this blog post, an email blast, and a ton of emails)

11:00-12:00 - relaxing and reading

A lot of my days look like this, although I don’t always work in the evening. Usually, I do some finishing work (fringe twisting, hand sewing, etc.) on the couch, but most of my finishing work gets done while I'm at shows, so I’ve been doing a lot more work on the computer in the evenings lately.

What I love most is having the flexibility to decide what I want to work on and when. Sometimes you just need to switch gears for a while to get your inspiration back.

Do you work from home? What’s your workday like? 

Monday, September 22, 2014

Monday Mosaic: Less than 50 Shades of Gray

curated by Sharon Fischer, Stray Notions


Somewhere between 38-46 shades less I'd say ... what about you?

1. Willow Green and Gray Double Infinity Scarf - Handwoven Cotton, Loomination
2. Maine tourmaline necklace with pebble ecofriendly recycled sterling silver , Beryllina
3. Oxidized Sterling Silver Sparks Cuff Bracelet with Cubic Zirconia, Cristina Hurley Designs
4. Market/Beach tote - Vintage barkcloth with a tropical vibe, Stray Notions

Friday, September 19, 2014

Say Hello at Open Studios THIS Weekend

by Jon Barrows of Jon Barrows Art & Photography 

This weekend is a big weekend for Boston Handmade members, some of whom will be at Jamaica Plain Open Studios and of whom will be at South End Open Studios.

With two open studios happening this weekend, what better opportunity to get your hands on some beautiful handmade art, whether you're looking for jewelry, photography, greeting cards, mixed media visual art, or something you haven’t even dreamed of yet!

You can find the following Boston Handmade members (in alpha-order) at JP Open Studios:


You can download the map for JP Open Studios to ensure you can find everyone.

And last, but certainly not least, at South End Open Studio, you can find Jessica Burko,
Boston Handmade's founder at 35 Wareham Street.


Thursday, September 18, 2014

Consider doing a Trade Show!

by Diane Ivey of Lady Dye Yarns


Back in May of this year, my company, Lady Dye Yarns attended our first trade show. It was an incredible experience to showcase my yarn on the national stage and to meet so many leading manufactures in the textile business. Now that the trade show is over with, I went from being in 2 stores to now being in 20 stores!

Originally, I was very hesitant to participate in a trade show but received encouragement from another yarn wholesaler in Boston, Knit Collage. The cost of doing a trade show is very expensive and in order to go to The National Needle Arts Association Trade Show, I launched an Indiegogo campaign. I did not get the full amount that I was asking for but I raised enough money to take my team to Indianapolis. Doing a trade show opens up so many doors to opportunities beyond selling my yarn wholesale. The trade show allowed me to:
  • Find new distributors for my raw materials.
  • Understanding the trends happening in the textile community.
  • I was able to meet dozens of knitwear designers from around the world who I have reached out to create knitwear designs for Lady Dye Yarns.
  • I was also able to talk with people about how to successful operate my business. 
I learned many things through this trade show. Had I not taken the risk to go, I am not sure where my business would be today. If you are in the crafting world and are thinking about expanding your business, I highly recommend finding a trade show in your craft to attend.

The great knitwear designer Steve Berg who purchased yarn from Lady Dye Yarns!

Wednesday, September 17, 2014

Very Pinteresting

by Jill J. Burns, Early Bird Designs

Pinterest is my favorite social media platform. I suppose it’s not surprising that as an artist, I would be most interested in a site that is mainly images. As many of you know, Pinterest is a 

virtual bulletin board where you can collect and organize images by creating boards and pinning content for different topics that appeal to you. Now lots (over 17 million) of people use Pinterest for all kinds of reasons – perfect for collecting ideas for that bathroom remodel or planning Grampa’s 80th birthday. You can make that one a community board and family can pin their finds. But for me, and other artists/makers, it is great resource for inspiration, source


images for new work, and keeping current with trends. Having a tidy place for my curated images is super sweet. I still cut out images I find here and there and paste them into my sketchbook.  

Sometime old school still works too.  Boston Handmade has an eclectic group of boards with something for everyone. If you follow the boards any new content will come up on your homepage.


Pinterest as a marketing tool
Did I mention that lots of people use Pinterest? Well businesses have figured out it can be a powerful marketing tool. Artists and makers should get it on that action too. Since many folks 

make boards for projects they are planning, -- weddings, parties, wishlists and gift giving ideas – your
work could end up on someone board, which then gets repined, liked and spread through the virtual world like a wild fire. Pinterest has added a new feature so you can enrich your pins and have images linked to their original source. It makes things convenient for viewers to go directly to your Etsy or website. 

Here is some more info on using Pinterest to its fullest marketing potential from Copyblogger and ArtBizblog.

Pinterest the largest rabbit hole of them all?  
Now we all know that social media turns procrastination into an art form. Since Pinterest is a feast for the eyes, hours can drift by looking at one compelling image that leads to the next, and the next. Not gonna lie, Pinterest is pretty seductive that way. So darn visually mesmerizing. So watch out!

Tuesday, September 16, 2014

Take time off and do something fun

by Diane Ivey of Lady Dye Yarns

Sometimes taking a break in your craft can be so rewarding! I have spent this whole summer dyeing yarn, teaching classes, and connecting with yarn stores and I realized I really needed to have a break. Often times we are so focused on our work that we forget the other important things in our lives such as family and friends.


This summer, I made it an effort to take care of myself and do fun activities. Although we did not have a hot summer here in Boston, I did find time to go to the beach with friends and soak up some sun and knit. As summer comes to and end and fall is in the air, I want to encourage all of you to take some time to do something fun outside of your work. If you live in New England consider going apple picking, wine tastings, and even jumping in leaves this fall! It’s all about a work life balance!

Monday, September 15, 2014

Monday Mosaic: Pumpkins!

curated by Susanne from enchantedhue


Handwoven Throw Rug by Loomination
iPad Ereader Pillow Stand by abigailleigh
Leather and Plaid Cluth by LidaBrookDesigns
Toucan Photo Art Card by jbarrows

The moment we flip the 'August' page on the calendar to 'September', it seems that every imaginable food item turns pumpkin flavored. At least here in New England. It is like somebody took a magic wand and *poof* - pumpkin!

Coffee, cream cheese, ravioli, ice cream, tea - even dog treats!

Since pumpkins have such a warm lovely color, I chose a few Boston Handmade pieces in this enticing shade of orange for you this week. Now you can sit on your rug, iPad propped up to play music, writing a little note to your friend who gave you that nice clutch as a present, all while sipping pumpkin flavored coffee and nibbling on a pumpkin macaron.

Saturday, September 13, 2014

DIY alert: How to sew a child's birthday shirt

by Jessica Burko

This post must begin with a disclaimer: I am not a professional seamstress. Where crafting is concerned I have no idea what I'm doing really, I just wing it. A better description of me is that I'm a creative mom who likes to make special things for her children, especially for their birthdays. I did not grow up in a house with sewing, I do not have any handmade clothes from my grandmother, I have taken one short sewing class ever. I don't have a fancy iron, I use a tiny table top ironing board, my sewing machine is 20+ years old. That all being said, if I can do this little project, so can you.


For me, a big part of this project is getting to reuse and upcycle old clothes. I've been making these birthday number shirts for my kids since my son turned two, and I've always found fabric supplies in our old-clothing bins. With his fifth birthday coming up I found a seldom worn plain gray shirt in his dresser, and a scrap of green patterned fabric on my sewing shelf.

My daughter's third birthday is in a couple of months and since I was sewing anyway, it seemed like a good idea to make her birthday shirt too, and then her shirt took on a life of its own. I was only able to find a blank short-sleeved shirt in my daughter's dresser and with a cold weather birthday she really needed a long-sleeved one, so I added sleeves made from an old pair of her leggings before beginning the main event of adding a number to the shirt front.

How to Sew a Child's Birthday Number Shirt

Level of difficulty:
Low, but it's recommended that you've sewn a few things before this project, like curtains or an apron or something.

Total time to complete project:
Depending on your level of experience it could take from 30 minutes to an hour, but if you have all your materials assembled before beginning I can't imagine it would take longer than that.

Materials:
a plain cotton t-shirt
a small amount of patterned cotton fabric
a piece of fusible interfacing as big as your patterned fabric
a spool of thread
a sewing machine
a few pins
a scissors
a hand-drawn or printed number
an iron
an ironing surface

Optional:
a pair of cotton pants that your child has outgrown


1. Select a blank shirt from your child's existing wardrobe, or purchase one at a used clothing store, or purchase a new one. An all cotton shirt works best. If you want to add sleeves to a t-shirt also procure a pair of soft cotton pants (girls leggings work great). Use any color combo that you like. Make sure all the fabric you use in this project gets washed before beginning the project. If you don't want to add sleeves to your t-shirt, just skip down to the next set of images.

2. Cut off the pants legs at a length that makes sense for your child's arms. Use a long sleeved shirt from their current wardrobe to get a sense of the appropriate length, then add an inch to have room for sewing. You can eyeball it.

3. In this project the pink t-shirt has a cute little ruffle at the edge of the sleeves so I decided to keep that visible and add the long sleeves from the inside, giving it that *very cool* layered look. Slip the widest part of the pant leg into the t-shirt sleeve about an inch and pin all around so it doesn't shift when you're sewing it. The hem of the pants leg will now become the hem at your child's wrist. Slide the shirt onto your machine, choose a stitch pattern that you like (because it will be visible) and sew all around the sleeve edge.

4. Repeat for the other sleeve and then you'll have your blank canvas for adding the birthday child's special number.


5. Create your number template either by printing it from your computer or hand drawing a big bold number. Make sure the paper you select isn't very thick because you want to be able to see the number outline through the other side of the paper. Standard photocopy paper works great. Size your number as you like, using the shirt as your guide. You will be cutting and ironing your number in a reverse position so that the final application to your shirt is in the proper orientation. Yes, you could draw or print your number in the reverse however for those of us who get a little confused about the right side/wrong side of fabric in these types of situations, I find that keeping the template oriented properly allows me to be extra conscious of when I'm using it in reverse.

6. Meet your new best friend, fusible interfacing. Discovering this material completely changed my crafting life. With this simple magic paper you can do all kinds of appliqué without the edges fraying. You can purchase it in small amounts as pictured above or you can buy yards of the stuff on big rolls. Either way, it's great. When you first take it out of the package it is paper on one side and a sort of tacky/sticky surface on the other side. The tacky side is what gets ironed onto fabric, and then the paper side is removed revealing another tacky surface, so it can get ironed on to another piece of fabric or clothing. The photos as we go along will help explain this.

7. Turn your template right side down and pin it to the paper side of the fusible interface. Yes you can pin through paper, and no, it won't harm anything you are working with.

8. Cut through the template paper and the fusible interface, around the outline of your number.


9. Take the pins out and remove the template paper.

10. Iron the tacky side of your fusible interface to the wrong side of your patterned fabric. The number will look backwards, and the right side of your patterned fabric will be face down on your ironing board.

11. You don't need to iron very much and it will be good and fused. I used a setting for cotton and no steam. Once your number is fused to the fabric cut through the fabric and fusible interfacing around the edges of the number. I used a regular scissors for this project but if you will be doing a lot of sewing projects you might consider purchasing a good pair of scissors that you designate for fabric only so they stay really sharp.

12. Once the number is fully cut out, peel the paper backing off to reveal a second tacky surface.


13. Now (finally!) you are ready to fuse your number to your t-shirt. Decide where you want your number to be located on your shirt and iron it down, right side up, tacky side down, on the front of your t-shirt. Make sure you are happy with the location before you iron because once it's fused, there's no going back.

14. It looks like you're finished! But you're not. Well, you could be if you want, but it will look much better if you stitch around the number with thread. If you use heavy duty fusible interfacing the stitching is purely decorative, but it finishes the piece beautifully. You could hand stitch or machine stitch around the edges of the number.

15. I chose to machine stitch and used the same color thread that I used to attach the sleeves. I used a tight zig-zag pattern that I find works well with this type of project, but if you find an alternate type of stitch that you like that's fine too, just make sure to go around all the edges of the number.

16. Ta da! Now you have your number shirt ready for the birthday celebration! Even if the stitching is wonky, or something is not up to your usual high standards, don't worry, you see the imperfections more than anyone else and most important, your child will love it.

17. Of course I also made the number shirt for our son who is turning five this Sunday.

18. Here are the finished products! I know my kids will love them, imperfections and all.

I encourage everyone interested in sewing to try your own version of this project. It can be adapted to different sizes, and different appliques. It's fun, fast, and makes a great update to any wardrobe!

Friday, September 12, 2014

Why Handmade: Stephanie Cave Studio

by Lynn Mohney of Prunella’s Workshop

Stephanie Cave Studio is located right in the heart of JP Centre/South Main Streets First Thursdays Art Walk. I had the pleasure of holding a trunk show in Stephanie’s studio for September’s First Thursday, along with two other of Boston Handmade’s artists, Chris Lang of Chris Lang Photography, and Melissa Glick of Hacker Junk Creations. It was a lovely night complete with lively conversation, wine, and light refreshments.

First Thursday refreshments

I have long been fascinated with artist workspace, and Stephanie’s is no exception. Located on Green Street, right around the corner from the famous J.P. Licks, it appears a hole in the wall at first, with an attractive green sign that invites you right in. Her studio is bright and well lit, and buzzes with creative energy. Stephanie is very orderly, and her studio is well organized. Bolts of brightly colored textiles stand upright around the room in such a way, one cannot help but want to start color matching and designing with the different available patterns. Spools and bobbins in a myriad of hues of thread are neatly together, ready to stitch the fabrics together to create anything from a stuffed owl to a fan, to a skirt. Quilts in progress are draped in the back, almost ready to keep someone’s bed warm and cozy. I’ll bet you can’t guess what Stephanie’s favorite dog breed!


While sewing may be an art that has been around for centuries, do not doubt Stephanie has embraced the technology of the modern world. You cannot miss the antique Singer sewing machine sitting next to the large monitor of her computer. The combination embraces the domestic arts of the seamstresses of the past with a very modern thinking woman.


While my medium of choice has become metal, I grew up in the fabric stores across Massachusetts. My mother is a seamstress, and I learned how to sew at a young age. During the hours I was present in Stephanie’s studio, I had a mad desire to create something with the beautiful yards of cotton throughout the room. The fact I managed to refrain is a sign of great restraint on my part!

Stephanie Cave and Chris Lang
First Thursdays are continuing! We hope you will stop by, check out Stephanie’s studio, and see what other trunk shows will be showing up in the months to come! I also hope you will take the time to check out the works of Chris Lang Photography and Hacker Junk Creations. Chris has a keen eye for the perfect shot, capturing the beauty of the everyday world around us. Melissa’s work is fun and vibrant. Instead of creating computer digital art, She brings us art made from the actual computer parts. Melissa notes she wasn’t aware how interesting the inner workings of a computer were until someone opened one up and showed her what was inside!

Hacker Junk Creations by Melissa Glick

Stephanie Cave’s Studio can be found at 7 Green Street, Jamaica Plain. Hope I’ll see you there!
Related Posts Plugin for WordPress, Blogger...